[EN] Reset Glitch Hack tutorial

Hi,
This Tutorial explains how to hack your Xbox 360 with the Reset Glitch Hack of GliGli and Tiros in order to launch unsigned code.
I: Preamble :
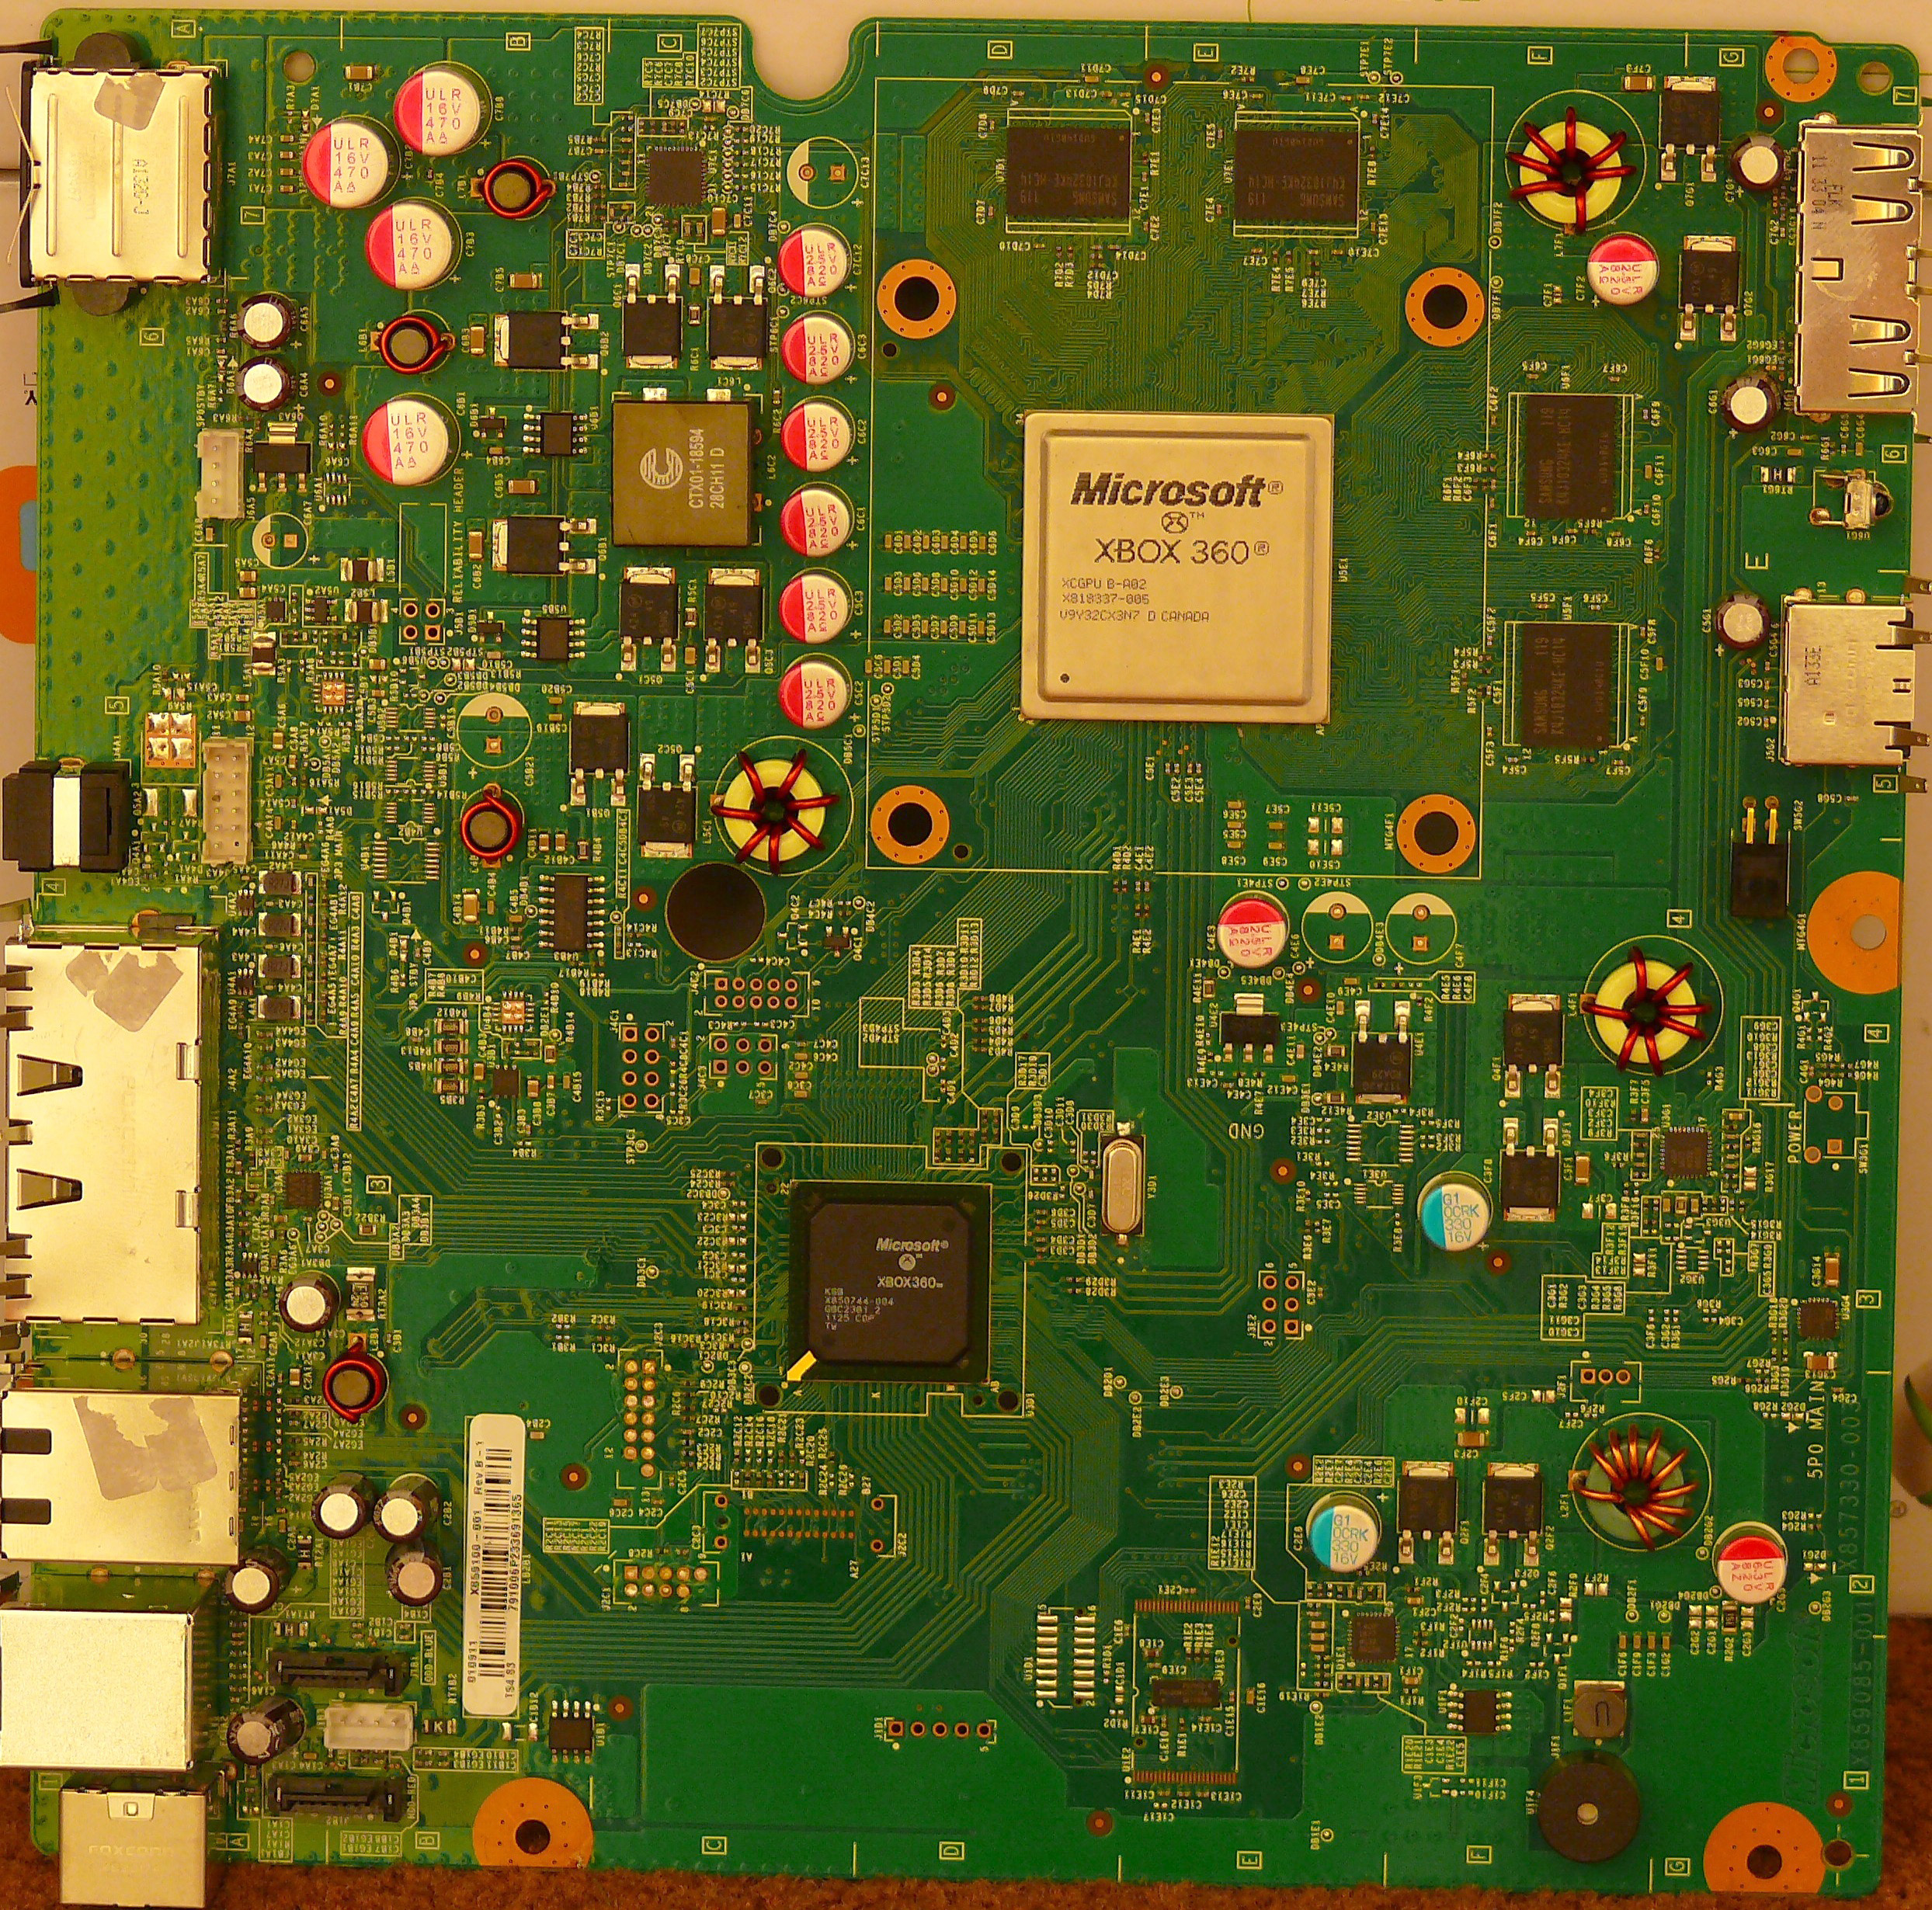
A: Compatible console revisions :
? FAT
? Opus
? Zephyr
? Falcon
? Jasper
? Slim
? Trinity
B: Exceptions
? FAT with split CB:
Some xbox Fat have a split CB (NAND contains CB_A and CB_B instead of CB_A only) they CAN'T be glitched at this time of writing.
? Zephyr CB 4577
? Falcon CB 5772
? Jasper CB 6752
? Slim with Corona motherboard
How to recognize it:
? There is no HANA chip
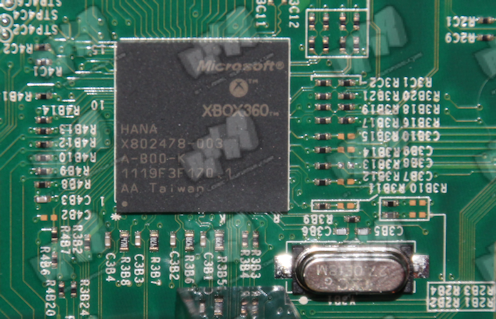
HANA chip
?On the backside of the case you can see an Amperage of 9.86A (Some trinity have that too but must of the console with 9.86A written are corona).
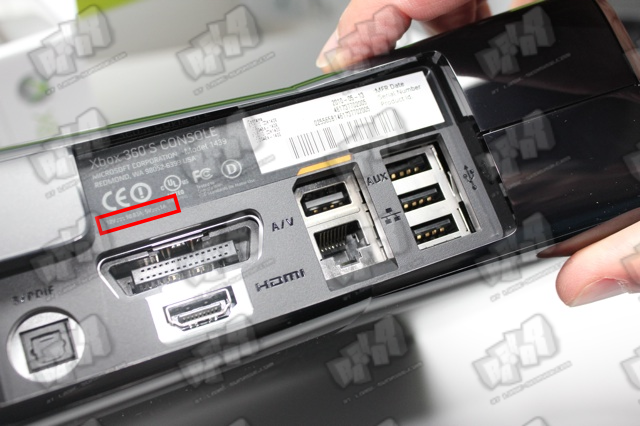
Backside of the Xbox Slim
II: REQUIRED HARDWARE AND SOFTWARE :
A: Hardware :
? GENERAL :
?CPLD module (XC2C64A chip based)
?JTAG programmer
?USB SPI NAND programmer
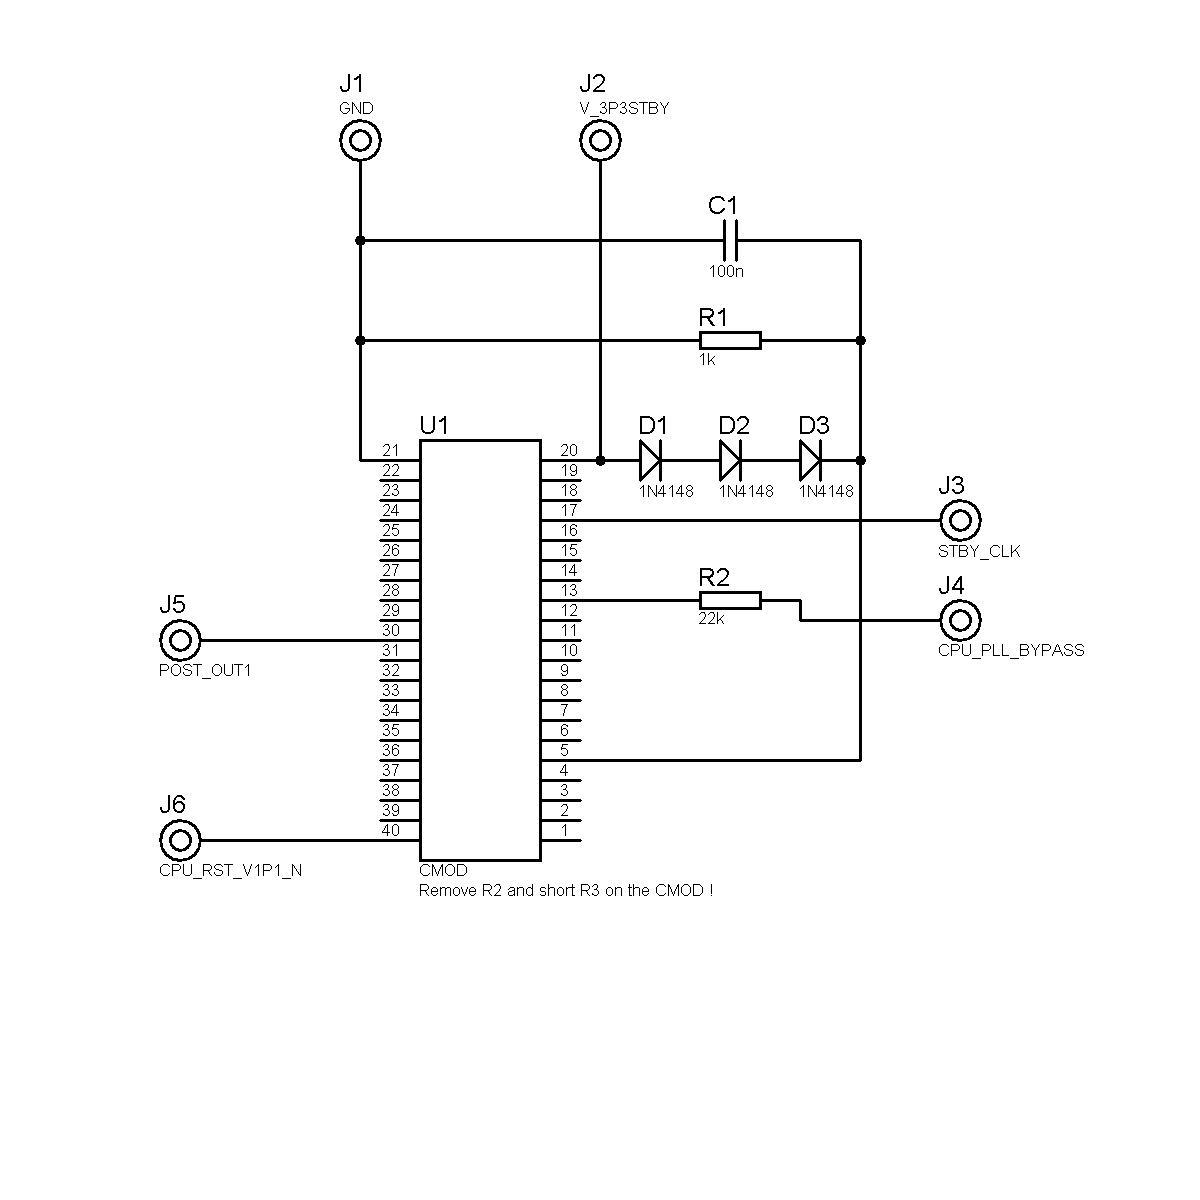
? FAT SPECIFIC (only for people using devboard : Cmod, seeedstudio) :
?3x 1N4148 diodes
?1x 22 kOhm resistor
?1x 1 kOhm resistor
?1x 100nF capacitor
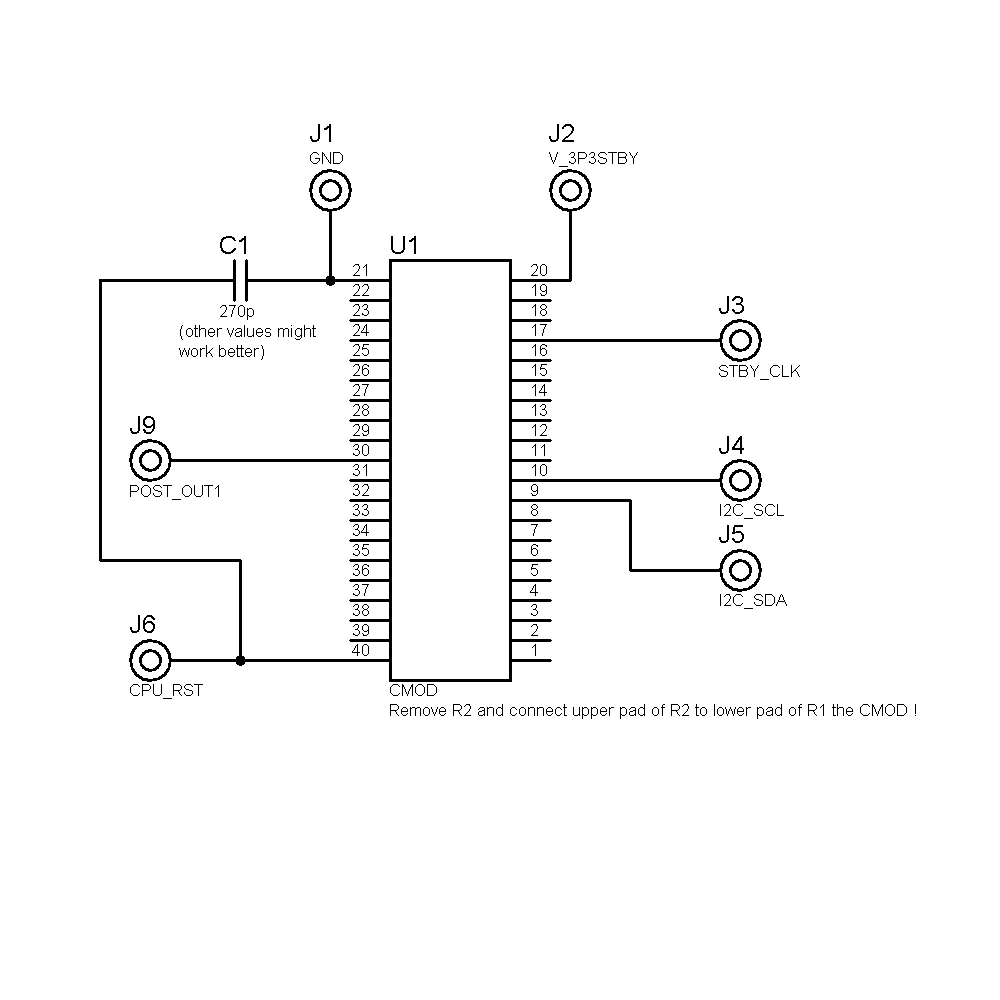
? SLIM SPECIFIC (only for people using devboard : Cmod, seeedstudio) :
? 1x 270pF capacitor
B: Software :
?Python and Pyton Crypto.
?Impact (from Xilinx Lab Tools) ott 360gcprog
?NandPro v2.0e (for PIC18 based NAND programmer) ou NandPro V3.0 (For LPC2148 based NAND programmer).
C: More Infos :
? Module CPLD disponible :
? Programateur Jtag disponible :
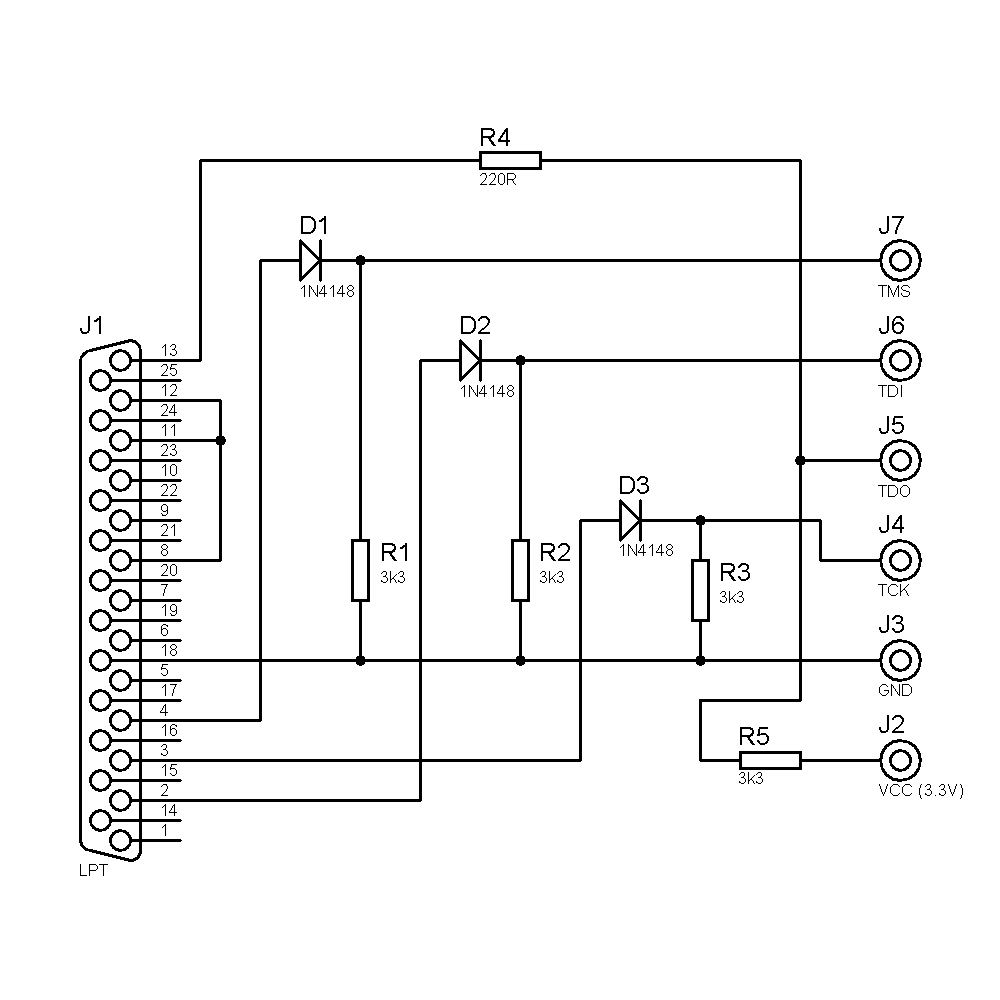
?LPT JTAG cable
?LPT JTAG cable maison
?Jtag to Usb Cable
?LPC2148 ARM (TeamXecuter NAND-X, Maximus NANDFlasher 360, X360Super Nand Flasher)
? NAND Dumper/Flasher disponible :
? USB SPI programmer
? LPC2148 ARM (TeamXecuter NAND-X, Maximus NANDFlasher 360, Super Nand Flasher)
? AT90USB
III: Hacking the XBOX
A: NAND Dump
Step 1 : Use the following diagram to solder your USB SPI Programmert
? FAT

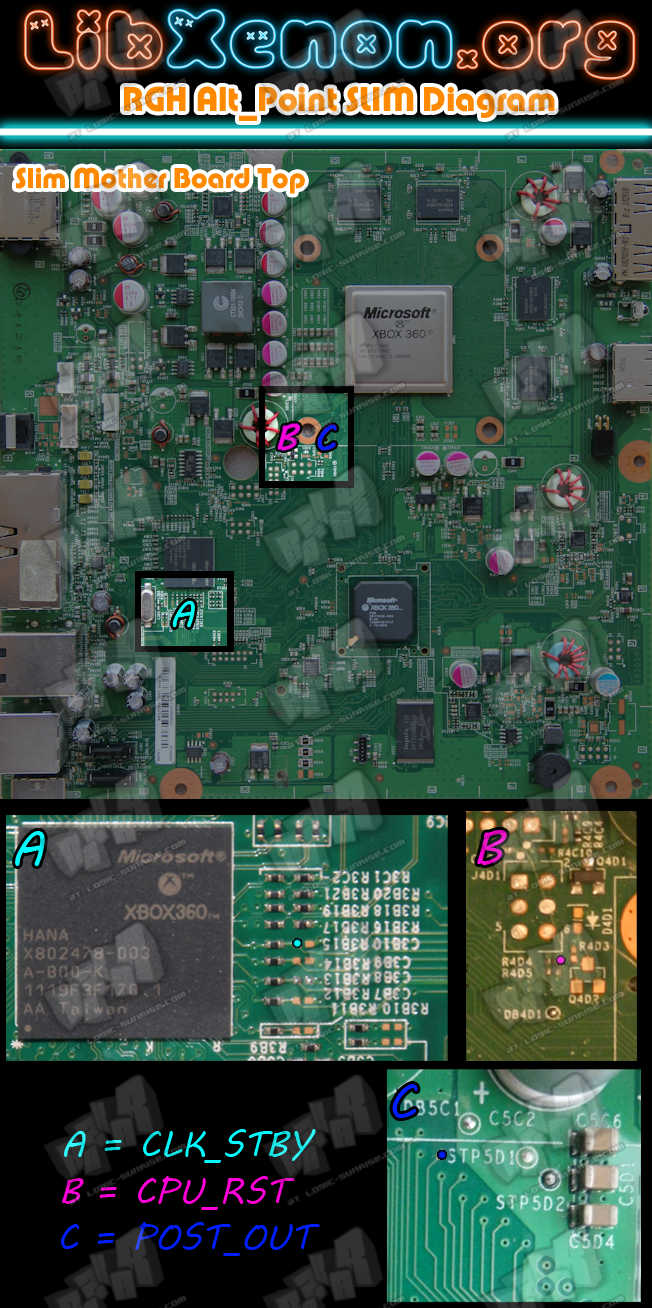
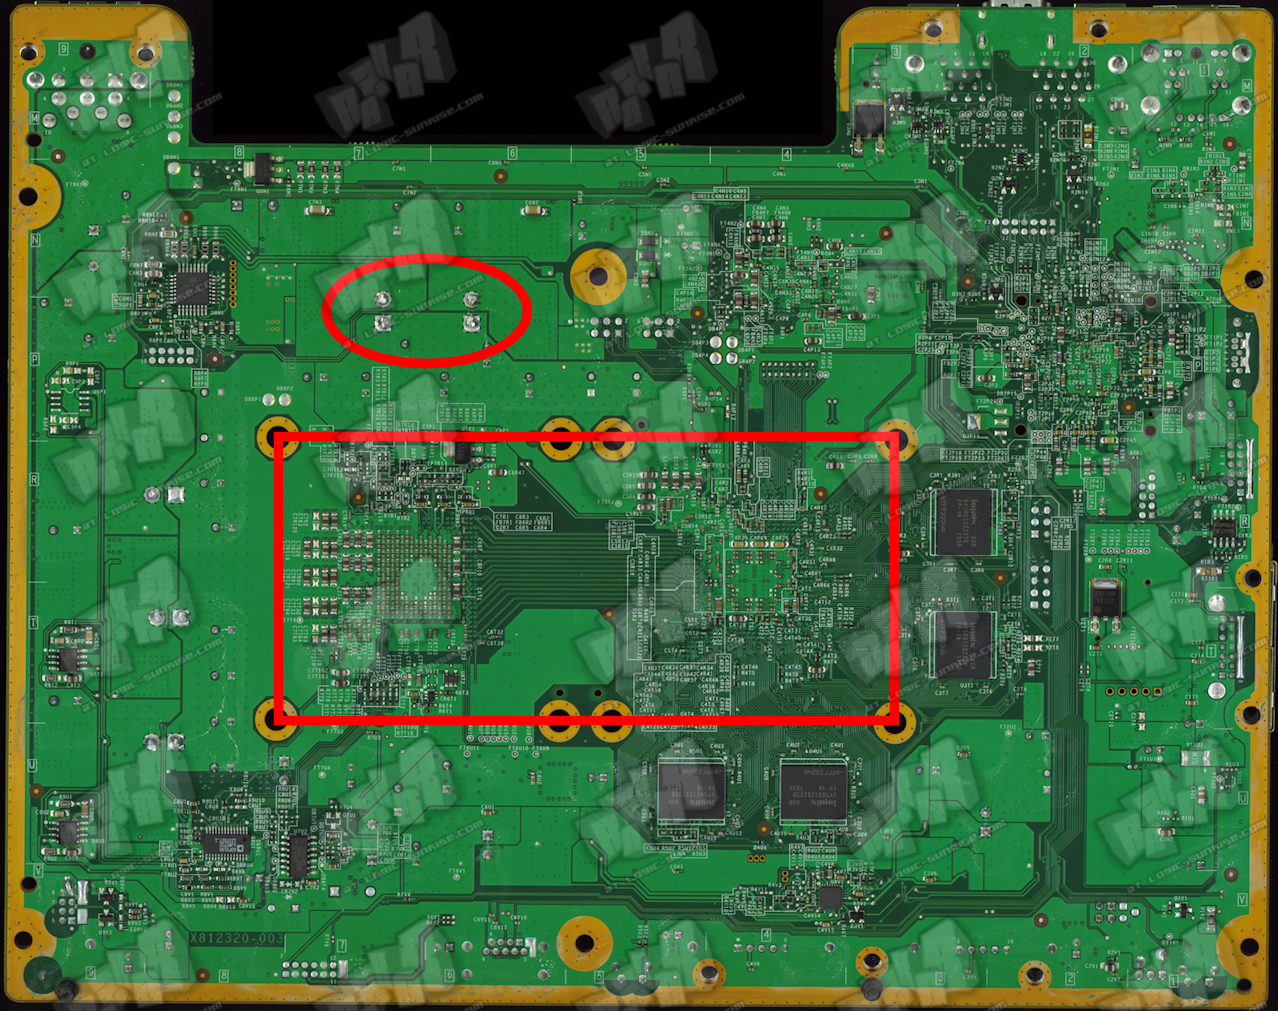
? SLIM
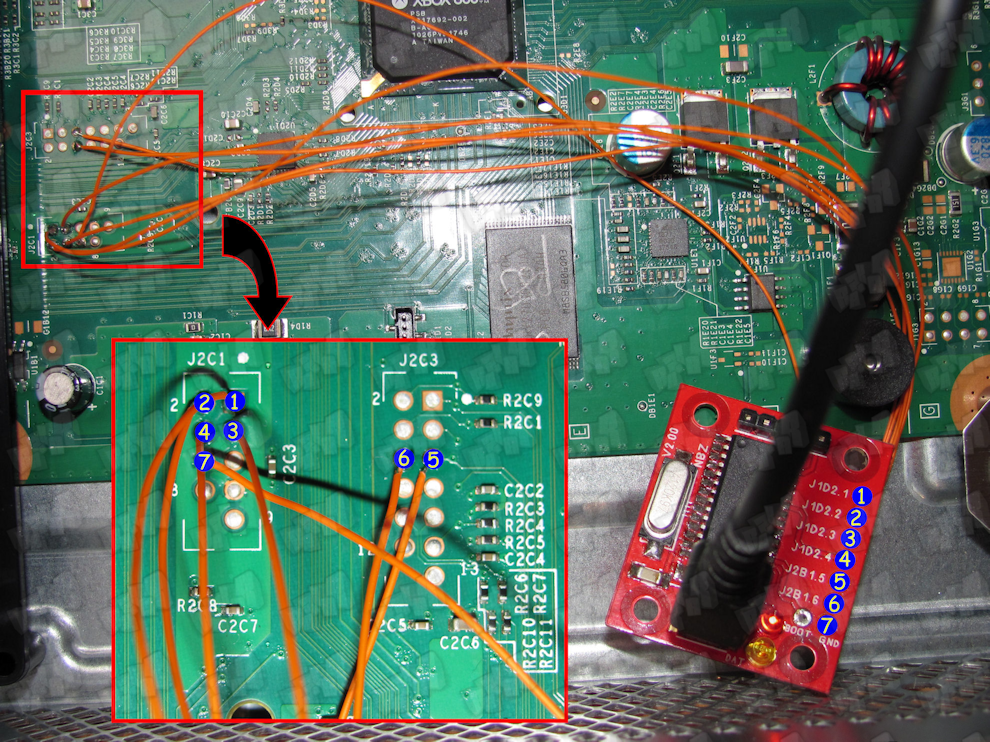
If you have a NAND-X you can find the diagram HERE
Step 2 : Open windows' command prompt and launch NandPro.
Étape 3 : Dump your NAND twice by using the read command :
? If you have a 16 mo nand
nandpro usb : -r16 nanddumpaname.bin
? If you have a 256/512 mo nand
nandpro usb : -r64 nanddumpaname.bin
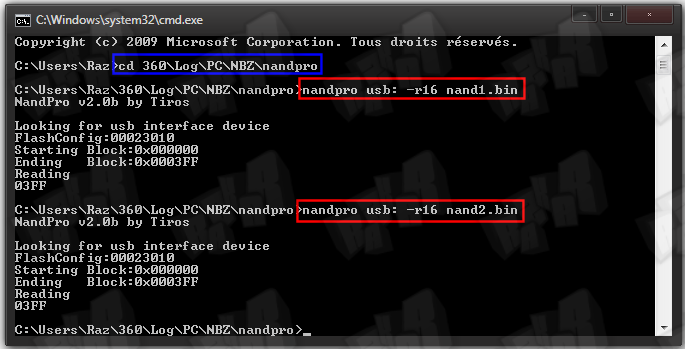
Step 3 : Compare the two dumps with the following command (you can use MD5 Checksums too) :
fc /b nanddumpname.bin nanddumpname2.bin
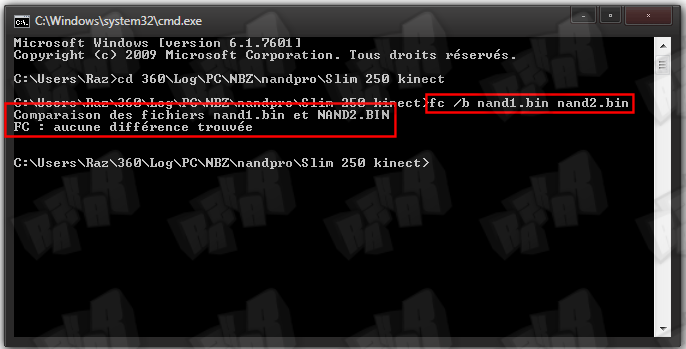
You should see something like FC : No difference found. If the two dumps don't match, do a new dump and check again.
B: Installation de Python et Python Crypto
NB : The part B et C can be done with GUI Apps like BestPig ToolBox or 360 Mutlibuilder, but in this tutorial we will explain the former method.
Step 1 : Install Python 2.7 (32bit!) and PyCrypto 2.3 with the default settings :
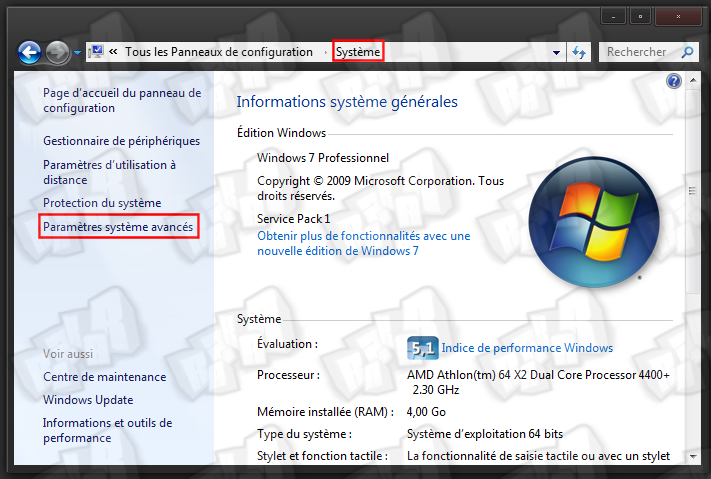
Step 2 : Go in Control Panel > System > Advanced system settings
Step 3 : Click on environnement variables
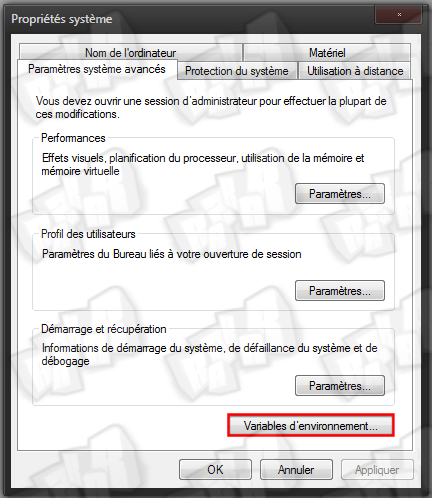
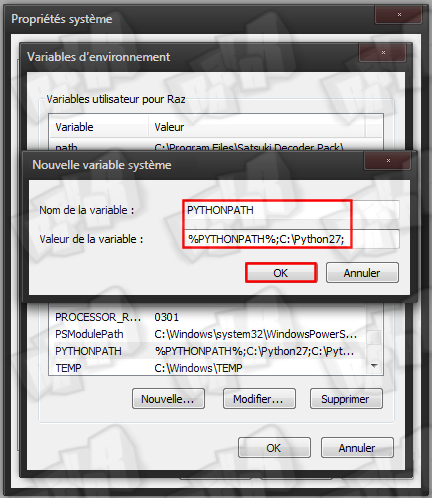
Step 4 : Click on New in system variable
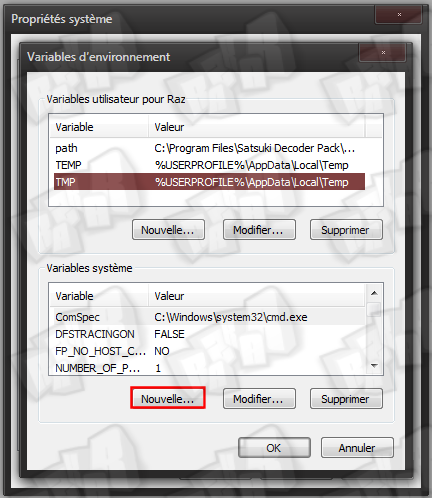
Step 5 : Add this for the name and the value of the variable :
PYTHONPATH
%PYTHONPATH%;C:\Python27 ;
C: Creating the ECC image :
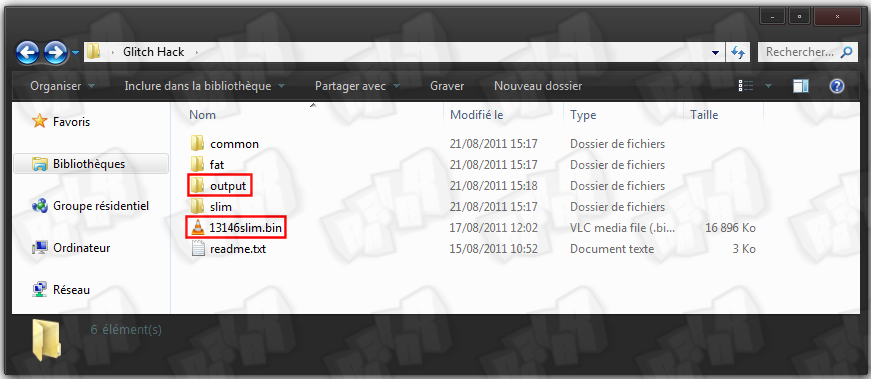
Step 1 : Download this archive and uncompress.
Step 2 : Put your original NAND dump in the root of the gggggg-folder and create a folder named "ouput" (in the root aswell).
The Step 3 and 4 arent' necessary for slim console.
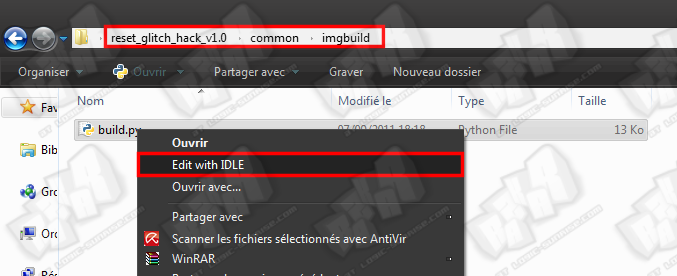
Step 3 : In the common/imguild folder, do a right clik on the build.py, and open with it IDLE..
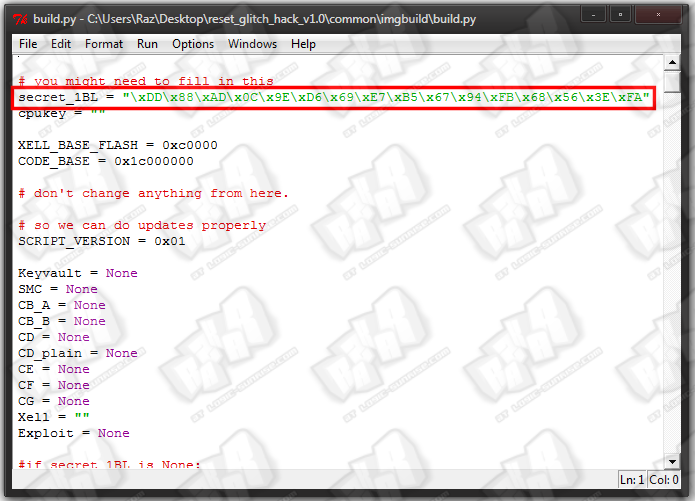
Step 4 : Then add the 1BL like that : :
\xDD\x88\xAD\x0C\x9E\xD6\x69\xE7\xB5\x67\x94\xFB\x68\x56\x3E\xFA
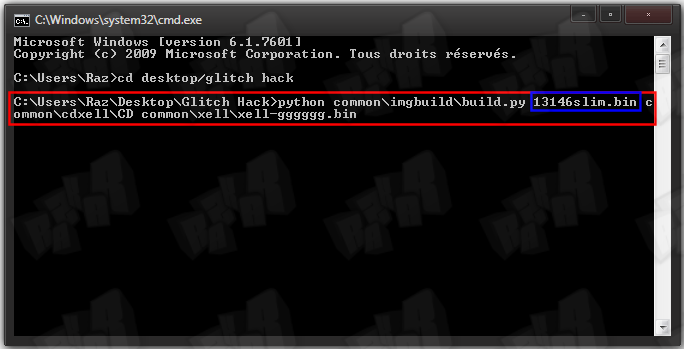
Step 5 : Open windows' command prompt again and navigate to the hack folder, then type this python command (don't forget to modify it with your NAND dump name) :
? Command for SLIM and FAT FALCON OPUS ZEPHYR :
python common/imgbuild/build.py nanddumpname.bin common/cdxell/CD common/xell/xell-gggggg.bin
? Command for JASPER :
python common/imgbuild/build.py nanddumpname.bin common/cdxell/CDjasper common/xell/xell-gggggg.bin
![]() SPECIFIC CASE
SPECIFIC CASE ![]()
If you have a Jasper with CB version 6751 you need to downgrade to 6750, download this archive, copy the cb_6750.bin file next to your nand image in the RGH folder.
Then use this command :
python common/imgbuild/build.py orig.bin common/cdxell/CDjasper common/xell/xell-gggggg.bin Cb_6750.bin.
Example with an Xbox Slim :
You should see the following
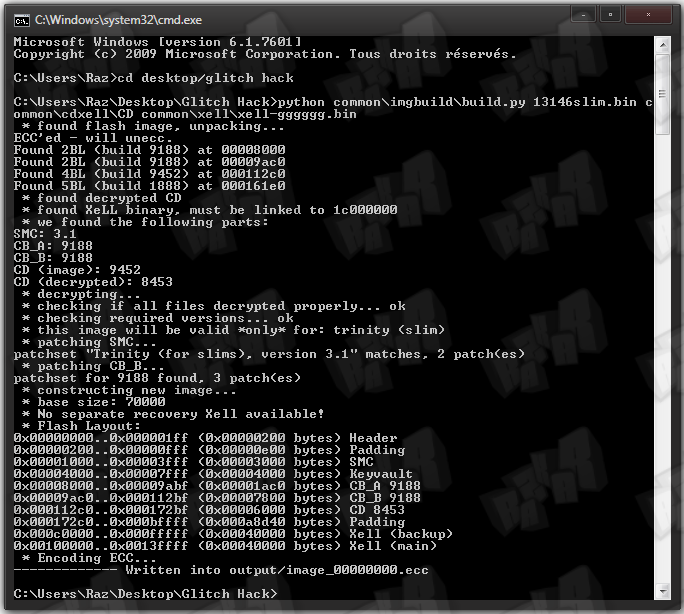
Once the process is over, you should find the file image_00000000.ecc in the output folder.

D : Flashing the ECC image :
Step 1 : Copy the image_00000000.ecc file into your nandpro folder and navigate to the folder via command prompt again.
Step 2 : Use the following command to flash the image to your console's NAND.
? SIf you have a 16 mo nand
nandpro usb: +w16 image_00000000.ecc
![]() Pay attention that you have to use the +w16 command instead of -w16
Pay attention that you have to use the +w16 command instead of -w16 ![]()
? If you have a 256/512 mo nand
nandpro usb: +w64 image_00000000.ecc
![]() Pay attention that you have to use the +w64 command instead of -w64
Pay attention that you have to use the +w64 command instead of -w64 ![]()
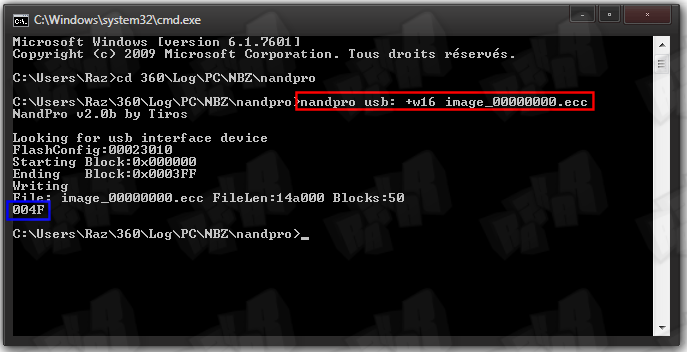
The flashed file has a size of 50 blocks so you should see 004F when the flashing is done.
E: Wiring :
? SLIM
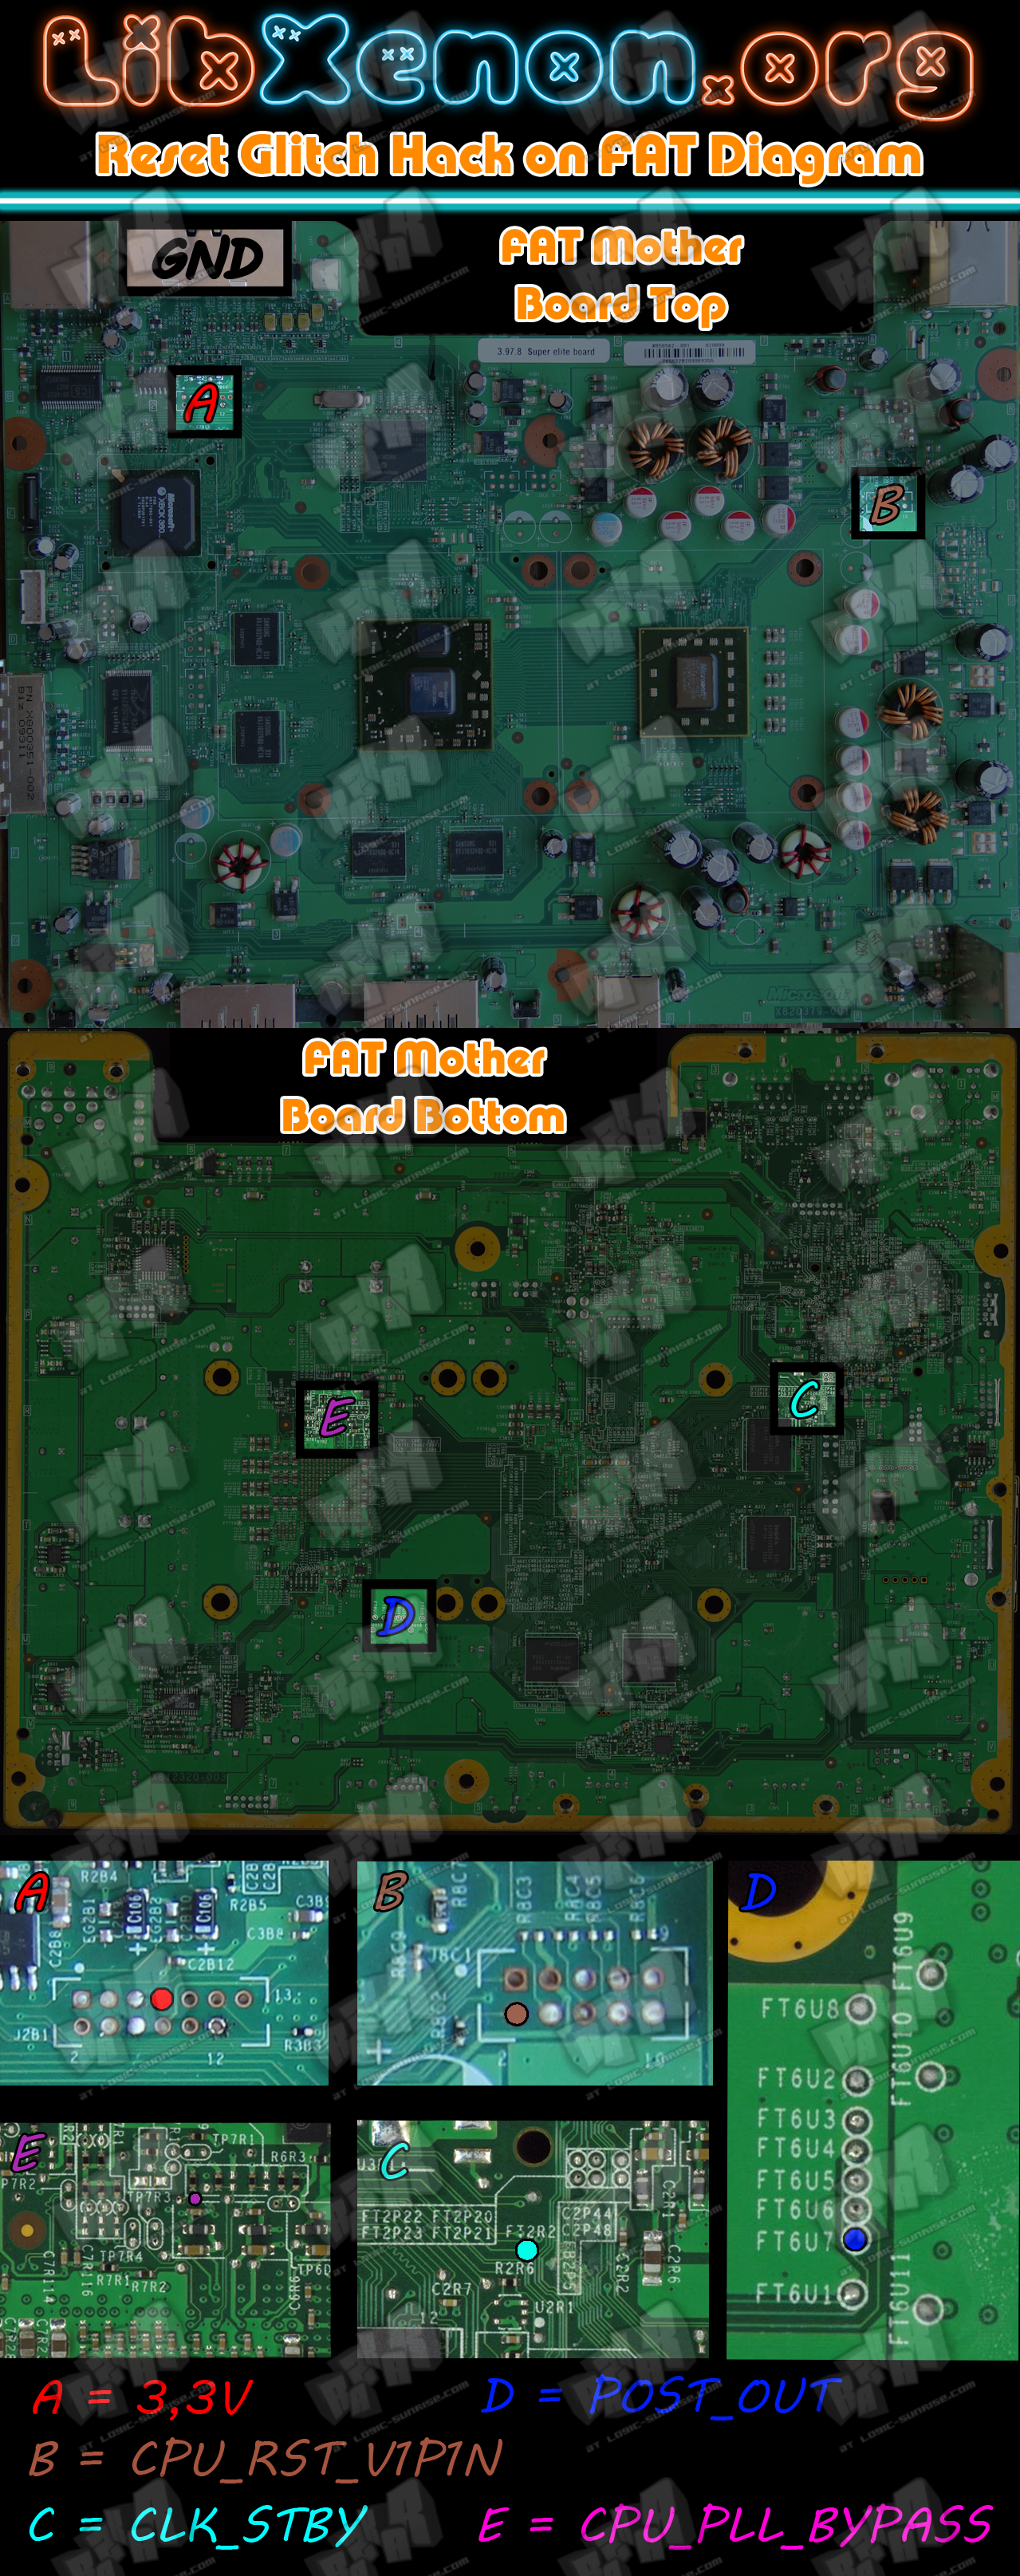
If you use CMOD or seeestudio board, you will have to add this electronic components :
? SLIM

If you use CMOD or seeestudio board, you will have to add this electronic components :
F: Programming the CPLD :
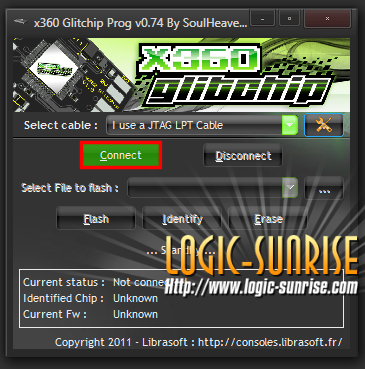
Step 1 : Grab your LPT/USB XilinX JTAG programmer cable. Connect the cable to the PC and the CPLD.(If you don't have one, you can use GliGli's schematic to build a LPT JTAG Programmer)
Step 2 : if you use a LPT a cable, connect the power suppy to your console without turning it on.
Step 3 : Two program the CPLD you can use, 360gcprog (recommended) or "iMPACT" (from XilinX Lab Tools)
? 360GCProg
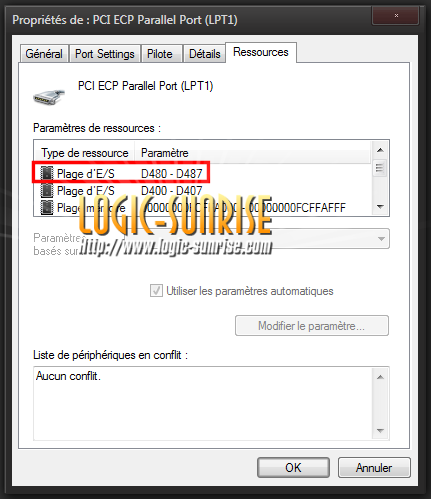
Step 4 : If you have a LPT Jtag cable, you will have to know the port adress of you LPT cable. Go in Device Manager and in the Ports (COM and LPT) section open the properties of you cable).
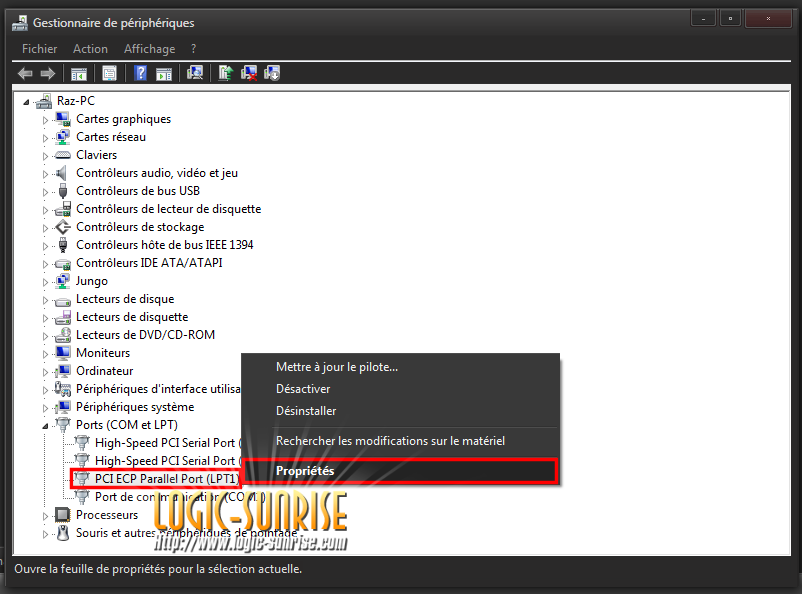
Now check the Input Adress (on the pics it’s D480)
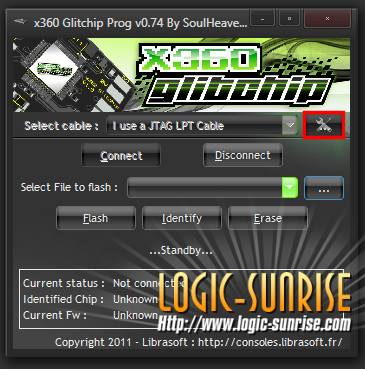
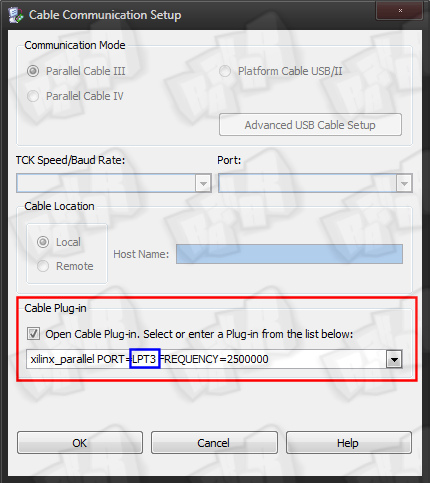
Step 5 : In select cable, choose if you have a USB ou LPT cable:
? If you have a USB cable go directly so step 4.
? If you have a LPT cable, clik on the settiongs logo.
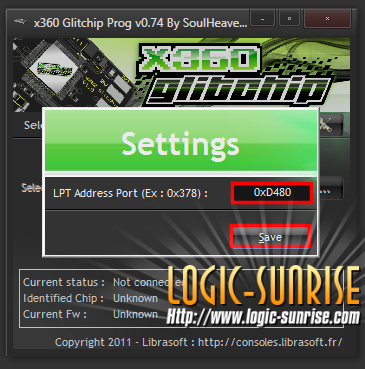
Step 6 : Put the value we get in Step 1 and then Save.
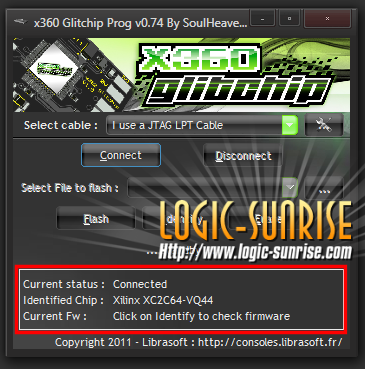
Step 7 : Click on connect, you should see the status at the bottom moving to Connected and displaying the chip model.
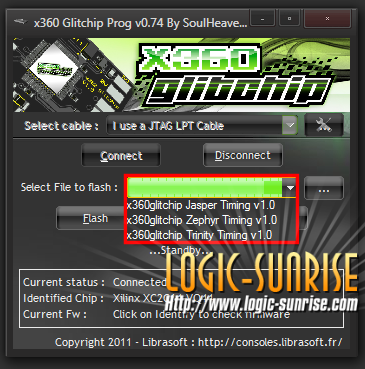
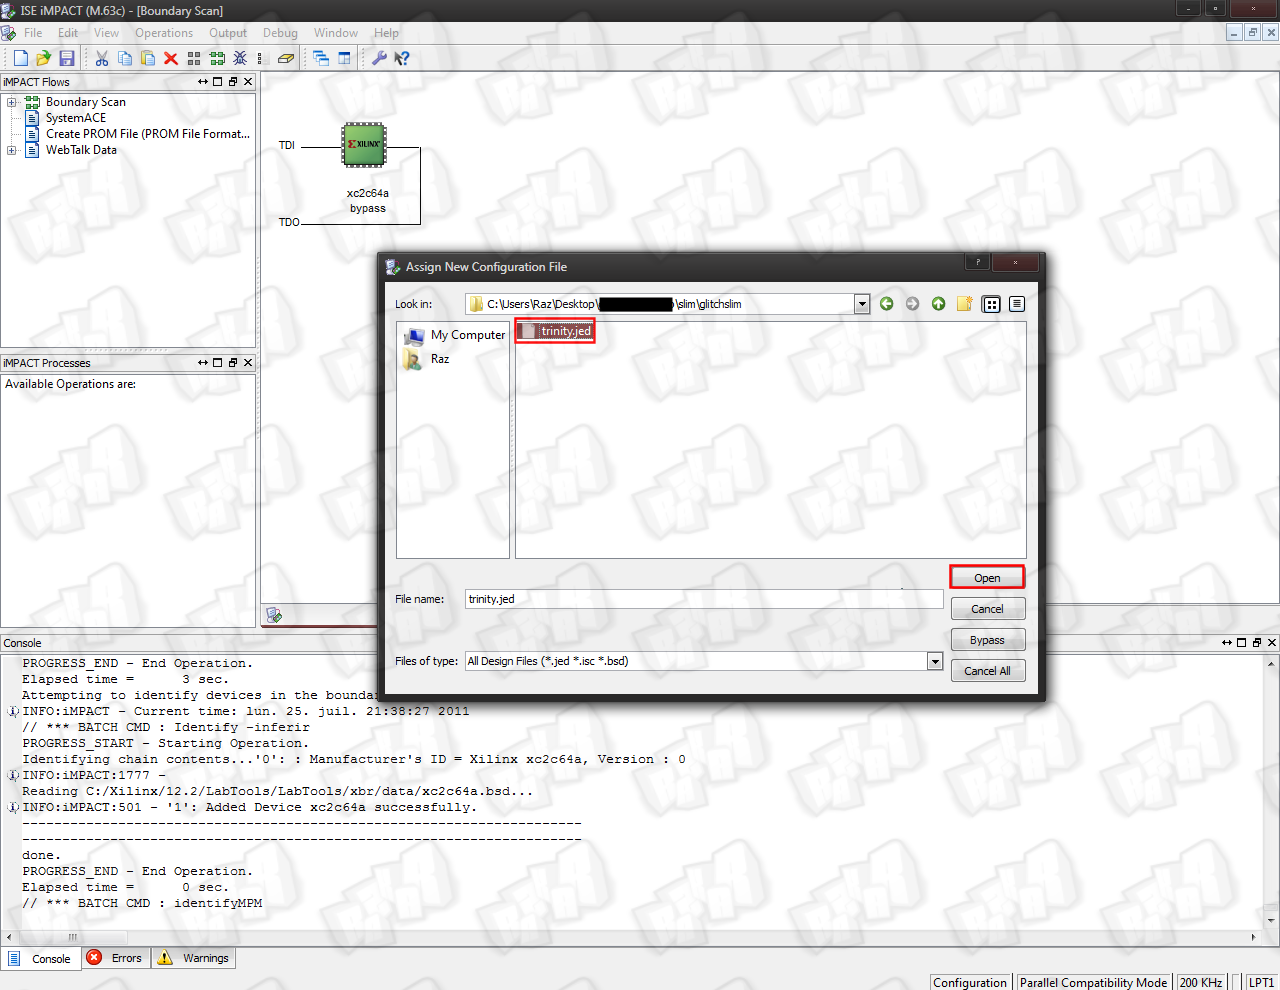
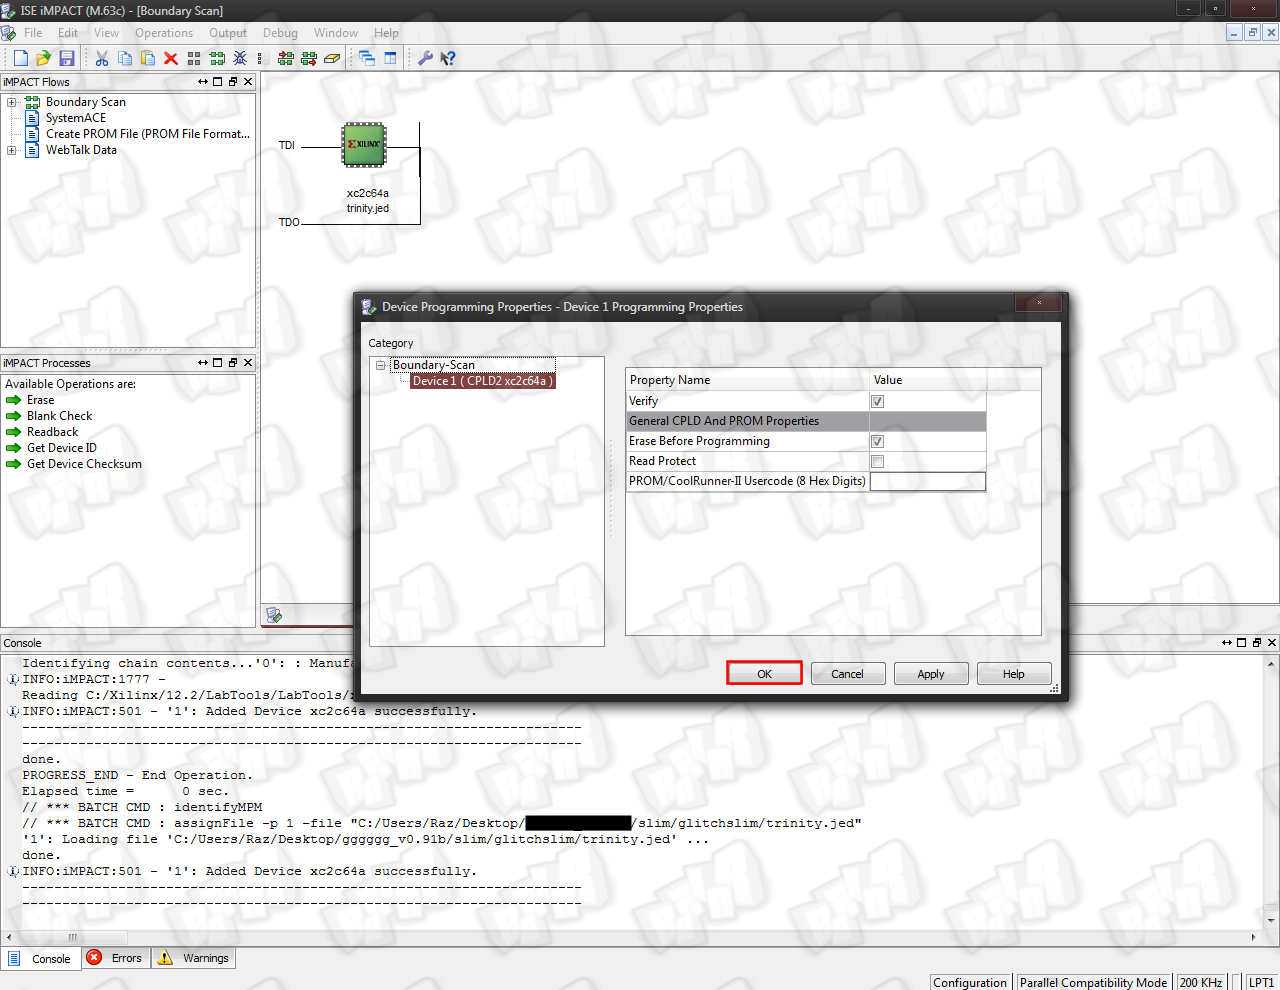
Step 8 : In select file to flash, click on the small arrow and choose the JED corresponding to your motherboard.
NB : You can use a custom on by clicking on the … logo
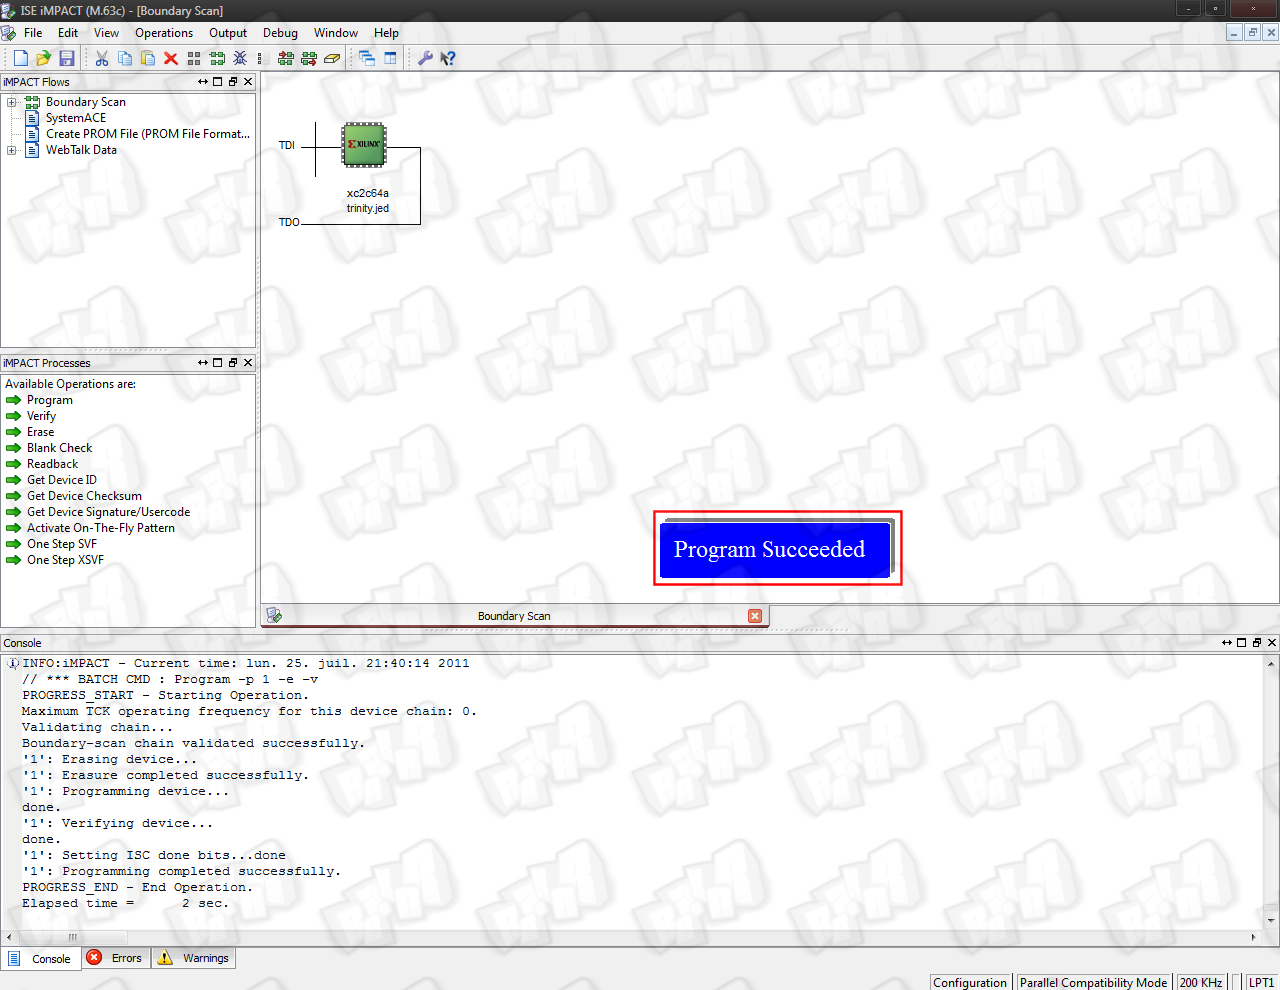
Step 9 : Now clik on Flash.
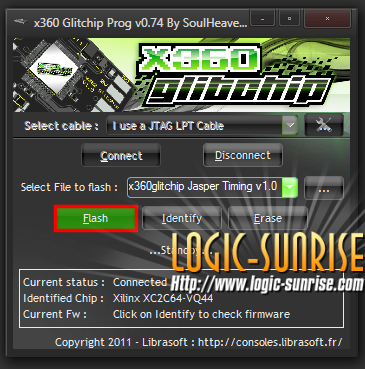
You should see :
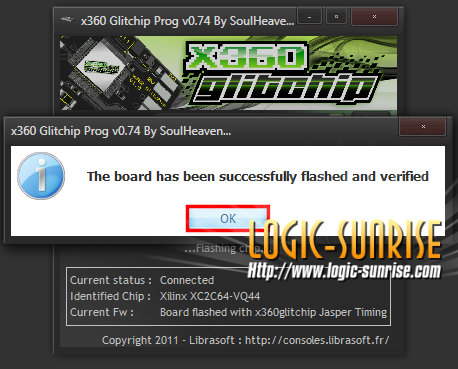
Your CPLD is now programmed and ready to make your console glitch.
? Impact
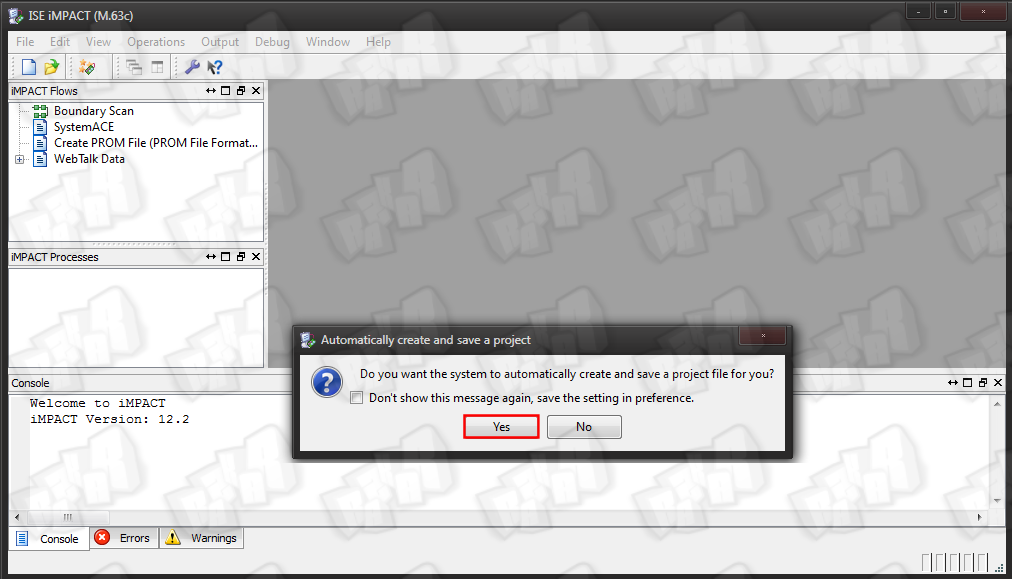
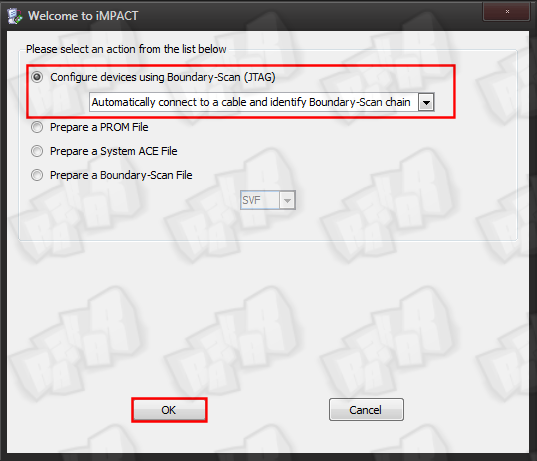
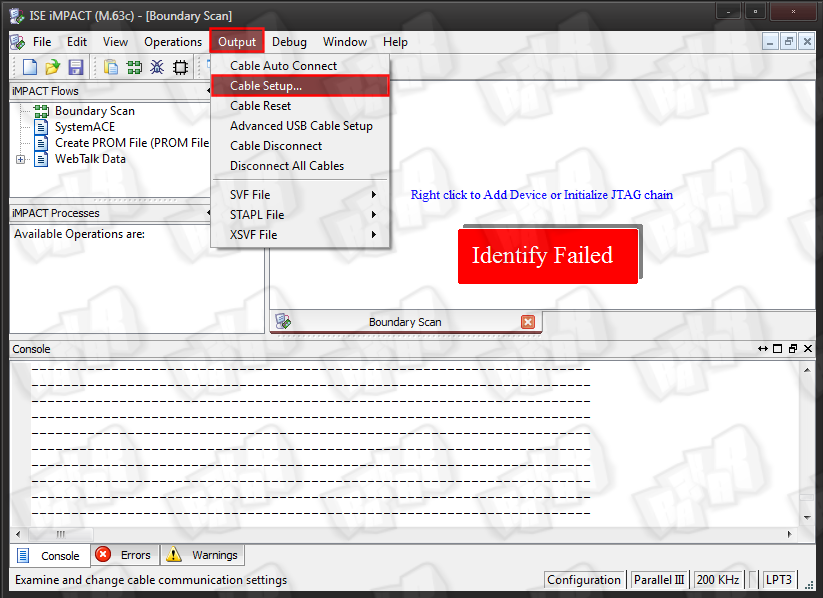
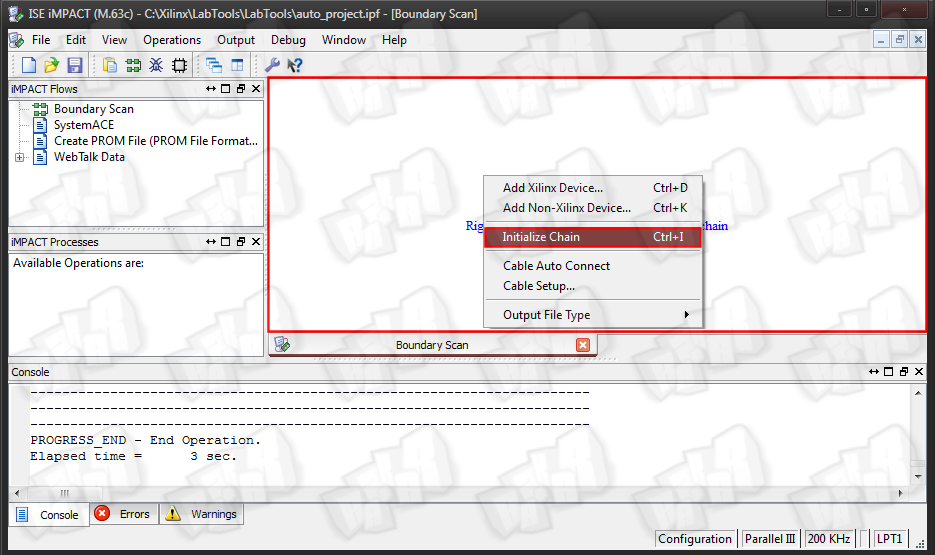
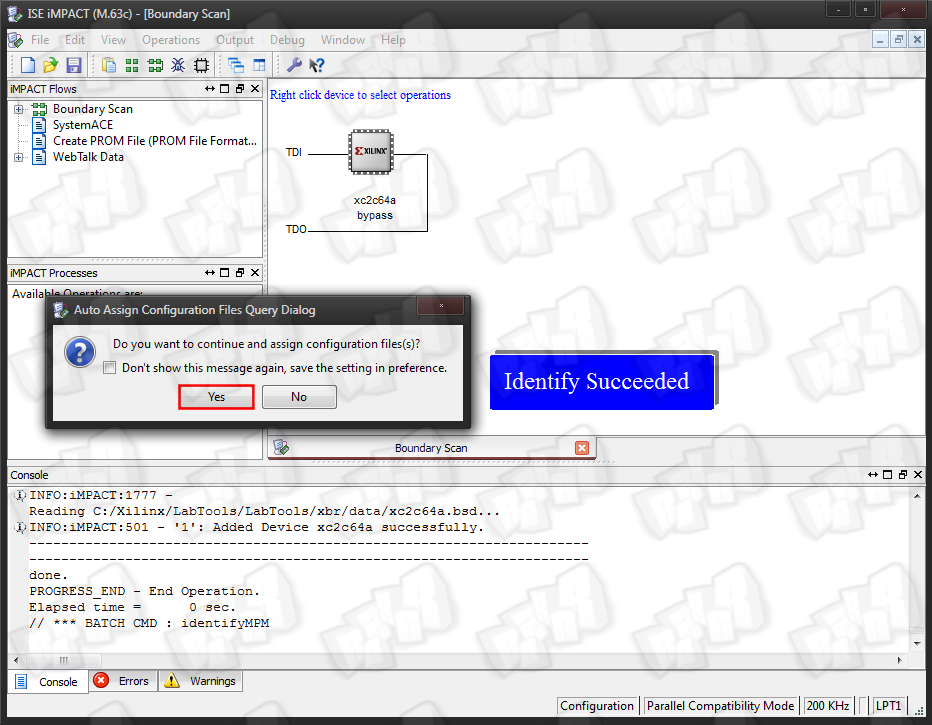
Launch "iMPACT" (from XilinX Lab Tools) and let's start the programming ... just follow the images.(You have to setup the compatibility mode only if your Programmer does not get detected right away).

Selectionner le JED pour Zéphyr ou Jasper selon votre console.

F: Grabing the CPU keys and building the Hacked Image:
Step 1 : Connect your xbox (to your local network too), start your console normally and see XeLL boot within 2 minutes
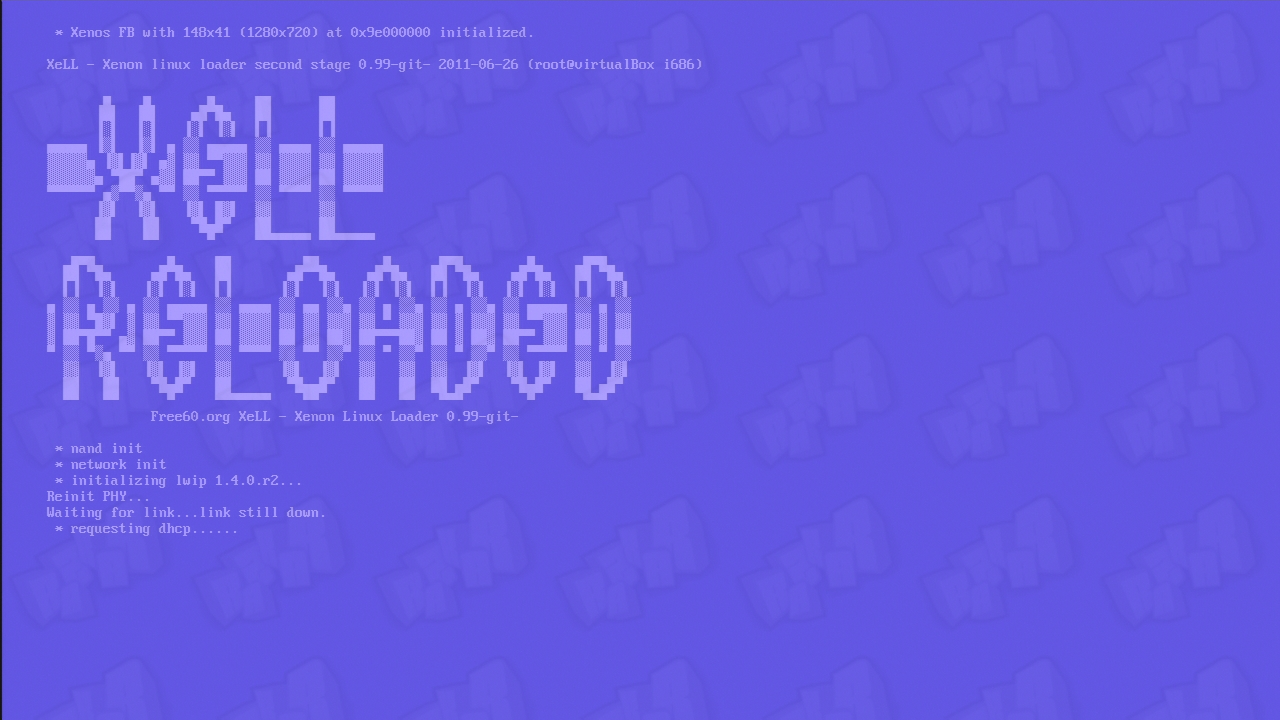
Step 2 : Note the Ip adress written at the end of XeLL :

Step 3 : Create your nand with XeBuild GUI. Follow the step in the video (watch in full screen for better quality).
Example for Xbox Slim :
The FCRT patch permit to not provide FCRT.bin and .meta files for the building process. You can use it on all xbox slim except the one with 1175 Drive.
G: Flashing the hacked NAND
Step 1 : Download RawFlash V4 and put the xenon.elf file at the root of the USB key.
Step 2 : Copy the hacked NAND renamed nandflash.bin at the root of the USBkey.

Step 3 : Plus the USB key in your 360 and turn it on, you should see this :
H: Installing Dashlaunch
The patch for dashlaunch are already added in the nand built by Xebuild GUI, you only have to create a launch.ini file in order to set the apps you want on direct boot.
Step 1 : Create a NotePad file and rename it to launch.ini
Step 2 : Open the launch.ini with NotePad and set the path you want as directboot and quickboot:
Currently supported devices and paths:
- internal hard disk Hdd:\
- usb memory stick Usb:\
- memory unit Mu:\
- USB memory unit UsbMu:\
- big block NAND mu FlashMu:\
- 4Go Slim memory IntMu:\
- CD/DVD Dvd:\ (not recommended to use this one)
buttons can point to any xex, or any CON with default.xex in it on any of the above devices
note that Right Bumper is ALWAYS default to return NXE
This file should begin with [QuickLaunchButtons]
For example mine is
[QuickLaunchButtons]
Default = Usb:\applications\FSD2 Alpha\Default.xex
BUT_X = Hdd:\Content\0000000000000000\C0DE9999\00080000\C0DE99990F586558
My console startup on FSD and if i press X it boot on XeXMenu. To boot on NXE maintain RB during return to dashboard.
Step 3 : Put the launch.ini at the root of your HDD USB, HDD 360 or memory unit
H: Avatars Update
Step 1 : Download the official update corresponding to kernel version you need. (type in the LS bar search the number of the update ex : 14699, 13599 ...)
Step 2 : Rename $systemupdate to $$ystemupdate
Step 3 : Placez le dossier à la racine d'une clé USB et laisser la mise à jours se faire. La console va redémarrer et les avatars seront installé.
IV: TroubleShootings
A: Soldering the Hardware
? After soldering i get 0022 RROD :
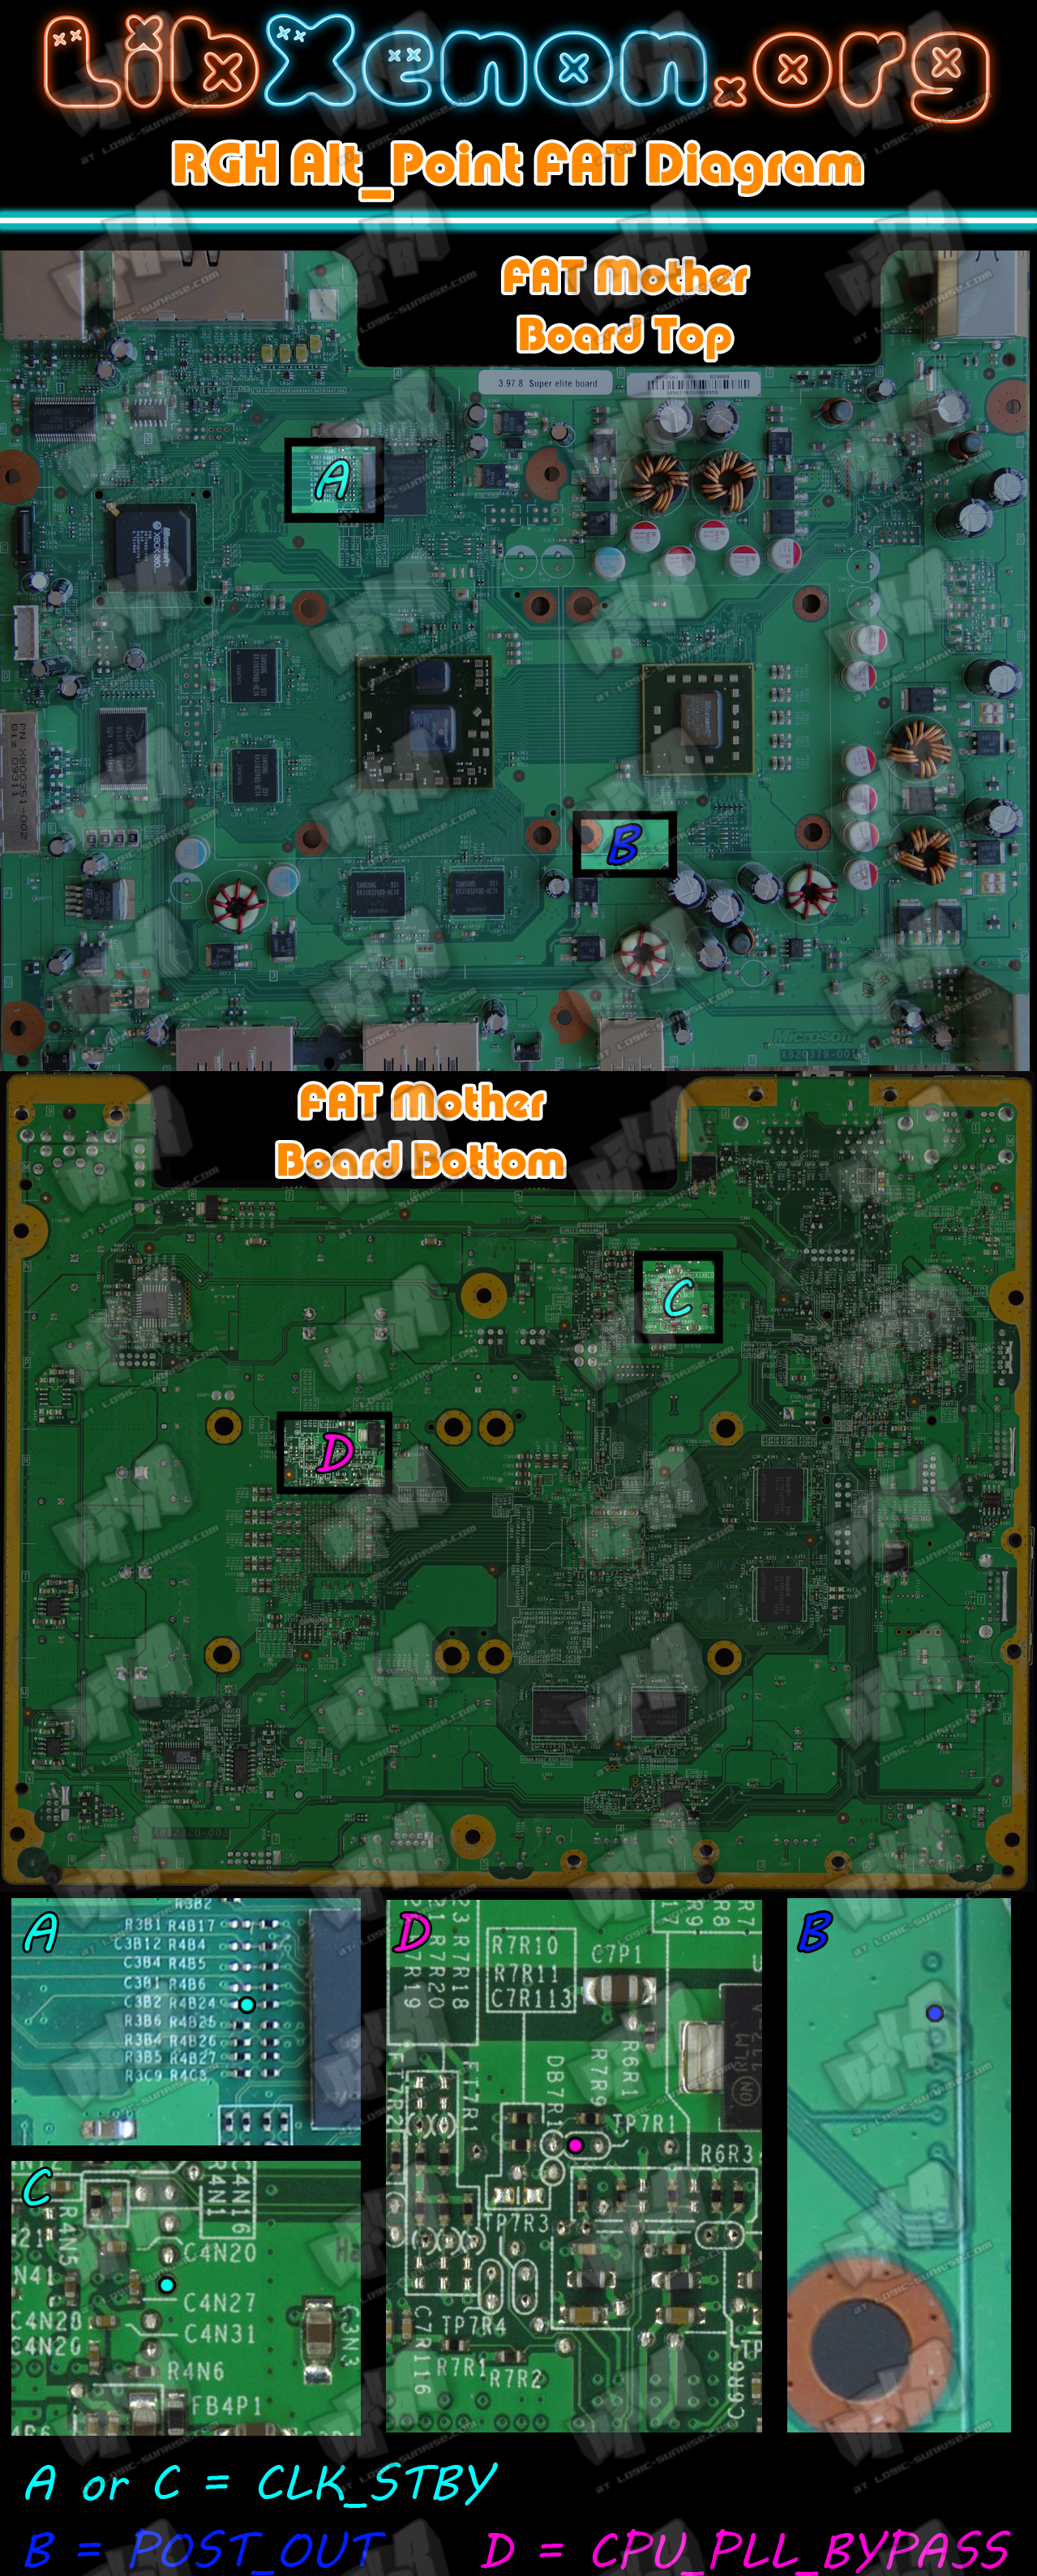
?This can happen if the wire from CPY_PLL_BYPASS is too thick or too thin. Try to use another cable.
?You flashed the image with a wrong command via nandpro or you didn't flash the Hack-Image yet.
? The console doesn't show any reaction after the soldering (doesn't turn on) :
?The trace/solder point STBY_CLK could be damaged. Check it and solder again if needed. (It needs connection to the resistor!)
? A point of the motherboard got damaged while soldering:
?Get somebody, who knows what he does, to do this job
?Look at the diagram in the Altpoint folder
B: Programming the CPLD :
? Your CPLD don’t show up on iMPACT or 360gcprog :
?Vérifiez que votre CPLD est bien alimenter si vous utilisez un cable LPT.
?Vérifiez vos soudures et qu'il n'y est pas de court-circuit
C: Grabing the CPU key :
? Console doesn't show XeLL
?Be sure you hear the Resets (Power supply giving a high pitched sound, Fans slowing down around each 5 seconds)
?Check if the .ecc Image was created correctly :
- 1BL added in build.py for FAT?
- Did you use the good CD File (CD/CDjasper)?
- Did you remap the badblock before 4F,
- Did you flash the .ecc image with Nandpro 2.0e and the command "+w16" or "+w64" (depending on your NAND-Size)?.
?Avoid this area on FAT
? Xell Boot but console freeze randomly (FAT)
?Check you wiring don't pass throught these areas.
D : Hacked NAND :
? Xell Show up but not on the MS dash.
?The LDV value you used is probably false, grab it directly from XeLL : count the number of F in the fuseline 7, when you have the value rebuild a nand with the proper value and flash it.
VI: GREETZ :
? GliGli et Tiros for the hack
? Cancerous, Ced2911, Tuxuser et [cOz] for their help and support
? _n3o_, SoulHeaven, Swizzy for the pics and support
Tutoriel realisé par Razkar pour Logic-Sunrise.com
Diffusion/modification interdite sans notre accord
")


here is a tutorial for who can't understand french
http://consolesnews....x-360-rgh-with-writemyessay-coolrunner
Thanks, I've a RGH and a JTAG and I favor the RGH more.The reason is simple - it can be done on a slim. Not sure if Xbox 360 LT 3.0 can be jtagged. Any experience with it?


